
Handling Holiday Returns
A huge shout-out to all of the amazing sellers here at Bonanza this holiday season! Thanks for all you do to keep customers happy and coming back to the site. We appreciate your efforts and are working hard to support you in your business.
While the holidays bring extra sales, there are also inevitably returns to go along with them. Returns are a fairly common occurrence for e-commerce businesses, but you can use the experience to your advantage. The right policy and procedures can boost repeat purchases and earn customer loyalty. In this article, we will review our refund process all the way through to our sellers getting their refund for the commission fee.
Bonanza is home to over 40,000 sellers, each with unique business needs and individual policies. There’s no “one size fits all” return process at Bonanza because we want you to have the option to handle returns in a way that works best for your business. However, there are three major steps to processing a return on Bonanza, each customizable to your business model.
Step 1: Receiving the returned item
Customers are often disappointed or frustrated when an item they bought doesn’t work out, so keeping a calm demeanor during your interactions with these buyers will work in your favor. If you do not accept returns, be sure to communicate this quickly and politely to your customer. You can expand on your return policies or direct them to your Booth Policies page if necessary.
#protip: Be upfront about your return policy: set your booth return policy via the Shipping & Returns tab in your booth settings.
If you accept returns, the first step is to work with the buyer so they can send the item back to you. We don’t currently have the capability to sell return shipping labels through Bonanza, but you can purchase a return shipping label through your preferred provider (Stamps.com, UPS, etc.) and send the label to the buyer directly. Simply contact the buyer via Bmail and request they provide their email address so you can email the shipping label to them. Paying for a return label upfront is a gesture of goodwill to your customer, and lets you control the shipping service your item will receive.
Alternatively, you may ask the buyer to purchase their own shipping label, and consider reimbursing them via a third-party payment processing company (like PayPal). Once you’ve received the returned item, you can go about refunding them.
Step 2: Refunding your customer
Many sellers wait to refund the order until they receive the item from the buyer. This helps protect your business against any potential purchase fraud.
If you do encounter any issues with the returned item, let us know about it; we have a dedicated fraud prevention team that is committed to protecting our sellers and minimizing fraudulent transactions.
Once you’ve successfully received the item, it’s time to issue a refund. How you refund your buyer depends on how they paid. Here’s how to handle a refund for a transaction made from our various payment methods:
PayPal. If the buyer used PayPal, refunds can be issued for up to 180 days. To find the most up-to-date information on how to issue a refund via PayPal, follow these simple instructions.
Stripe. Refunds and disputes can be managed directly from your Stripe account dashboard. Learn more about how to issue a refund with Stripe.
Step 3: Post-return processes
After you’ve received the item and refunded the buyer, there are a few final things to take care of:
Submitting a fee refund request
You have up to 180 days from the date of the transaction to request refunds on your final value fees. The buyer must be refunded before you may request a fee refund for the canceled transaction.
To request a fee refund, go to your "Billing statements" page and select the month in which the transaction took place. Next to the refunded order, click the red "x" and follow the prompts to request a fee refund for the transaction. We'll use the data given to us by the payment provider to confirm the refunded transaction.
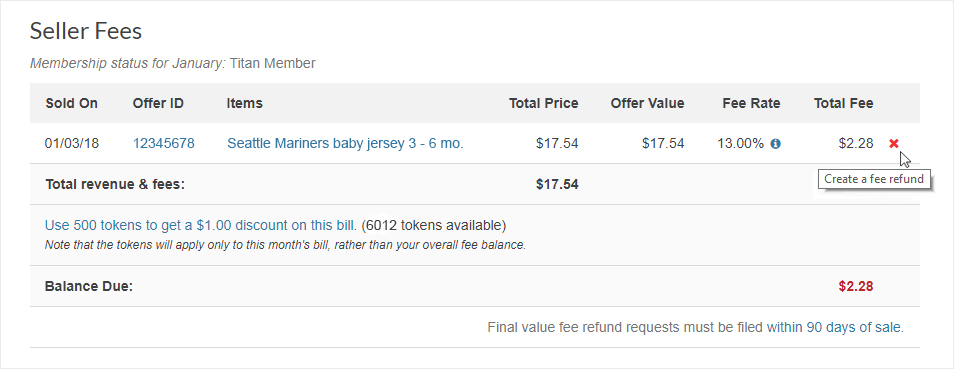
If we’re unable to confirm the refund, we’ll request further information from you to ensure that the refund did take place.
Relist your item
To save time, you can relist the returned item. Visit your “Recent Sales” from the Selling drop-down menu in the upper left-hand corner. From there, locate the order in question and simply click “Relist items” under the transaction summary.
All items in the order will be set to "Items ready to post" status. This allows you to delete any items from the order that you don’t wish to relist before you publish the items. Once you’re ready to publish the relisted item, visit “Add or edit items” from the Selling drop-down menu and select “Update your booth.”
The bright side
Processing returns can be tedious but it is a necessary part of the e-commerce cycle. Research shows that 92% of shoppers will purchase from a seller again if they provide a seamless return process, so use this information to stay on top of returns and possibly generate some repeat business.
<< Back
Recent Posts

How Bonanza's Google Shopping Advertising Works for YOU
Mar 14, 2024
Find us on Facebook and Instagram!
Mar 5, 2024
Phishing Awareness
Feb 27, 2024
New! Bonanza Webinar series with CEO Quincy Faison
Jan 23, 2024
Unveiling the Future: Bonanza's Exciting Plans for 2024!
Jan 18, 2024
10 responses to Handling Holiday Returns
Thank you.
You’re welcome, supsilver!
Interesting and useful information
Glad you found this information helpful, OlikoOliko!
Very concise, thanks for the information Shelly.
You’re welcome, Steve! Happy holidays!
Thanks!
You’re so welcome, RitaMSanders!
Happy Holiday’s!
Thank you
SS
Welcome! Happy holidays to you too, SherrieS207!
Login to see more comments